ShopDreamUp AI ArtDreamUp
Deviation Actions


Description
Okay! I promised Batman this so here we are! A little coloring demo on hair. Before hand I did a little sketch of this lady. She's not from any series or whatever so don't bother looking x.x If she looks like someone that's pure coincedence 
I used a tablet but if you have a scan of something with clean lines that's fine too. I used Photoshop 6.0 so I'm not sure how this works on other versions.
Some prelimenary junk:
i) I start with two layers. One is a background layer that's just white and on top of it is the layer I had my sketch on.
ii) Select the layer with your sketch and bring up the 'channels' window. You can find it on the top tool bar under Windows>Show Channels.
iii) A little box will pop up that has the RGB layers of your sketch. Select the little button at the bottom of the box that looks like a dotted circle. It selects your lines so you have the little preferration lines running on the sketch.
iv) Press delete on your keyboard and your lines become lighter looking. This is okay, we'll fix that next. Deselect your lines by pressing ctrl+D or just click anywhere outside the sketch with the mouse.
v) From here select the airbrush and get a fairly large brush. Make sure the pressure is at 100%. Make sure the layer is locked and then color over your lines to make them darker. I usually just go for black but you can pick any color you like on your lines using the brush or hue's option.
vi) Now that you have a layer that contains only your sketch you can color in the sketch beneath this layer fairly easily.
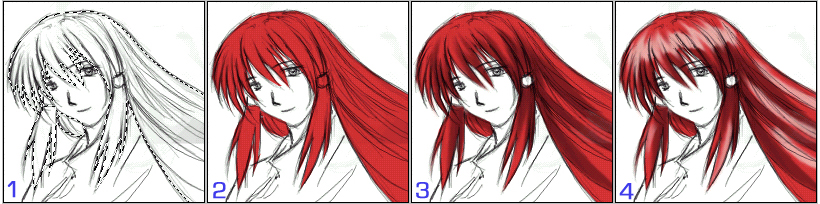
Coloring: These follow the numbers up top on the images now:
1] Create a new layer UNDERNEATH the sketch layer. Using the lasso tool (polygon) select an area you want to color (hair, skin, whatever). You can use the plus or normal lasso to do this. If you accidentally miss a spot you can come back to it later once you've lassoed everything with the lasso plus tool. Here I've selected all the hair on the lady.
2] Select the new layer you created and fill it in with the bucket tool depending on the color you like for that particular area. Here I've used red. Don't worry if you over or underselected things, we can fix that later. Deselect and you should have that area colored in fairly well, look it over and if there are spots where you want to fill in more or less you can use the smudge tool to drag color in or out of the area.
3] Lock the area and select a color thats a little darker than the base color. Here I've used a dark red. To get the 'sharp' look I used the smudge tool.
4] Finally create another layer above the base color layer. Don't lock it. Select a lighter color and make highlights. Use the smudge tool to fix the placement and look.
It's really more complicated than this depending on the look you want but hopefully this is a start ^_^ Gambatte minna~!
I used a tablet but if you have a scan of something with clean lines that's fine too. I used Photoshop 6.0 so I'm not sure how this works on other versions.
Some prelimenary junk:
i) I start with two layers. One is a background layer that's just white and on top of it is the layer I had my sketch on.
ii) Select the layer with your sketch and bring up the 'channels' window. You can find it on the top tool bar under Windows>Show Channels.
iii) A little box will pop up that has the RGB layers of your sketch. Select the little button at the bottom of the box that looks like a dotted circle. It selects your lines so you have the little preferration lines running on the sketch.
iv) Press delete on your keyboard and your lines become lighter looking. This is okay, we'll fix that next. Deselect your lines by pressing ctrl+D or just click anywhere outside the sketch with the mouse.
v) From here select the airbrush and get a fairly large brush. Make sure the pressure is at 100%. Make sure the layer is locked and then color over your lines to make them darker. I usually just go for black but you can pick any color you like on your lines using the brush or hue's option.
vi) Now that you have a layer that contains only your sketch you can color in the sketch beneath this layer fairly easily.
Coloring: These follow the numbers up top on the images now:
1] Create a new layer UNDERNEATH the sketch layer. Using the lasso tool (polygon) select an area you want to color (hair, skin, whatever). You can use the plus or normal lasso to do this. If you accidentally miss a spot you can come back to it later once you've lassoed everything with the lasso plus tool. Here I've selected all the hair on the lady.
2] Select the new layer you created and fill it in with the bucket tool depending on the color you like for that particular area. Here I've used red. Don't worry if you over or underselected things, we can fix that later. Deselect and you should have that area colored in fairly well, look it over and if there are spots where you want to fill in more or less you can use the smudge tool to drag color in or out of the area.
3] Lock the area and select a color thats a little darker than the base color. Here I've used a dark red. To get the 'sharp' look I used the smudge tool.
4] Finally create another layer above the base color layer. Don't lock it. Select a lighter color and make highlights. Use the smudge tool to fix the placement and look.
It's really more complicated than this depending on the look you want but hopefully this is a start ^_^ Gambatte minna~!
Image size
820x204px 212.1 KB
© 2004 - 2024 Yuri-Nikko
Comments65
Join the community to add your comment. Already a deviant? Log In
Much needed! I'll try this one out! ")